- Home
- Sewing Tips
- Sewing Instructions
Special Sewing Instructions for Doll Clothes
The sewing instructions for doll clothes are fairly similar to people-sized clothes for the most part. If you are making a skirt and blouse or trousers or pants and shirt, begin with the skirt or pants. Then make the blouse or shirt.
General Sewing Order for Doll Clothes
If you are sewing a dress, begin with the bodice, or top part of the dress. Sew any darts that are needed first, both in fashion fabric and lining. Then attach the front to the back at the shoulders for both fabric and lining. Sleeves are usually sewn in by the "flat method". This means you sew the sleeves in before you have sewn the side seams together. Do this for both the fashion fabric and any lining, if the sleeve is lined. Only then do you sew the side seams, continuing up to sew the sleeve seam at the same time. Once the bodice part of the dress in completed, continue on to work on the skirt.
Next, sew the skirt seams and attach the skirt to the bodice at the waist. Usually, the back of the garment is left open for either inserting a doll zipper, or attaching hooks and eyes or snaps. You must decide the type of closure you will use at the pattern-cutting-out stage—snaps or hooks and eyes require a larger seam allowance than a zipper, although I find leaving a generous seam allowance makes inserting a zipper easier, too. Whether you hem the skirt before or after attaching it to the bodice depends on the style of the garment you are making.
Generally, you usually attach sleeves in doll clothes using the flat method, but there are exceptions, depending on the style of the garment and the pattern. On these occasions, it may be easier to sew in the sleeve after the side seams are sewn, just as you would do on most human-sized patterns.
Unless you are making your own pattern, the instructions that come with the pattern you buy will tell you how they expect you to construct the garment. It is usually best to follow the sewing instructions on the pattern - if you are very experienced, you may choose to do some sewing steps differently.
Interfacing for Doll Clothes
Generally speaking, interfacing is rarely used for doll clothes. But occasionally it is useful, for example, in stiffening a bustier or a strapless bodice on a dress so that it doesn’t slide down the doll’s torso. Interfacing may be useful, however, in making some of the accessories you can make for your doll, such as hats or bags or other things.
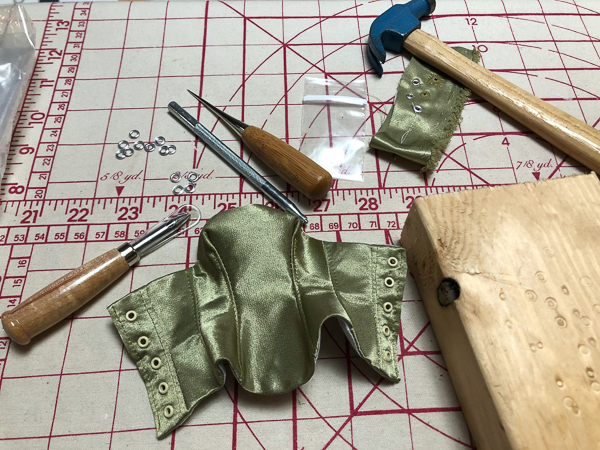
When using interfacing, don’t get regular-weight interfacing from the store—it’s too heavy for doll clothes. Instead, use either self fabric (either the fashion fabric or lining), or use cotton or silk batiste or something similar. This type of fabric will add no bulk to the tiny garment. For stiffening a bustier, I use the lightest-weight iron-on interfacing. You need a bit of body for these types of garments, particularly if you are going to use grommets. In fact, you will have to use fairly serious interfacing anywhere you use grommets or the garment won't hold up.
 Installing the rivets in a doll bustier
Return from Sewing Instructions to How To Sew Doll Clothes -->
Return to Home Page -->